Choosing Kitchen Cabinets for Your First Home: A No-Regret 7-Step Guide
Why This Decision Feels So Big (And How to Get It Right)
You just got the keys. You walk into the kitchen and it hits you. The cabinets are the biggest thing in the room. They set the tone. They eat up a huge chunk of your budget. And they are not easy to swap out later.
Choosing kitchen cabinets for your first home can freeze you in place. You have probably scrolled through a hundred kitchen cabinet ideas for first-time home buyers and ended up more confused. White or wood? IKEA or custom? Will this hurt resale?
This guide is not another gallery of pretty kitchens. It is a real, step-by-step process. I will walk you through exactly what to do, in order, so you can make a choice you will still love when you open that door years from now. No fluff. No pushing trends that will look tired by 2028. Just a no-regret path forward.
Step 1: Measure and Assess Your Actual Kitchen Layout (Before Opening a Catalog)

Most first-timers start by picking a color. That is backwards. Start with your tape measure.
Old homes are not square. A standard 24-inch deep base cabinet might be what you plan for, but if your fridge sticks out to 30 inches and there is a walkway next to it, you will hate that pinch point every single day. A mistake I see constantly is someone ordering a full-depth fridge and standard depth cabinets, then the fridge protrudes into the traffic lane. In a compact starter kitchen, a few inches can ruin the flow. Look into counter-depth fridges or plan a surrounding pantry cabinet with deeper sides.
While you are measuring, think about your upper storage. A few years ago everyone wanted open shelving because it felt airy and cheap. But Houzz data shows a 6% drop in open shelf demand in 2025, and glass-front cabinet searches shot up 45%. Glass-front uppers give you the display spot without the dust. For a first home, one glass-front cabinet to show off a few favorite pieces works better than a row of shelves you have to constantly style and dust.
Measure everything. Mark where the outlets are, where the window light falls, and which way the appliance doors swing. If the current layout mostly works, do not move plumbing. That money is better spent on better cabinets.
Step 2: Set a Realistic Budget That Splits Splurge and Save

Cabinets are not one price tag. There are levels, and you need to know where you land.
On the most affordable end, you have ready-to-assemble options. IKEA SEKTION boxes paired with custom fronts from a company like Semihandmade can run about $100 to $300 per linear foot installed. Emily Henderson put it best on her blog: “If you’re on a budget, IKEA cabinet boxes with custom fronts are a game changer for first-time homeowners. You get the quality hardware and custom look for a fraction of the price.”
If you want all-plywood boxes with no particleboard, look at The Cabinet Face (formerly Nelson Cabinetry). Their RTA solid wood cabinets land in the $250 to $400 per linear foot range. It is a sweet spot. For semi-custom with a design team that holds your hand, CliqStudios offers free 3D renderings and ranges from $300 to $550 per linear foot.
Now, the splurge and save part. Splurge on the things you cannot easily add later: soft-close drawer hardware and plywood boxes. Save on fancy crown molding and internal organizers. You can drop in drawer dividers and pull-out racks next year when your bank account recovers. Do not let a big number at the bottom scare you off. This is your first home, not a custom forever kitchen. Many affordable kitchen cabinets for first home projects end up looking far more expensive than they are because the money went to the right places.
Step 3: Choose a Door Style That Matches Your Home’s Architecture and Era

Choosing kitchen cabinets for your first home means picking a door style that looks like it belongs. Shea McGee of Studio McGee says, “When you’re building or renovating, the cabinets are the biggest visual element in the kitchen. Choose them first, and everything else falls into place.”
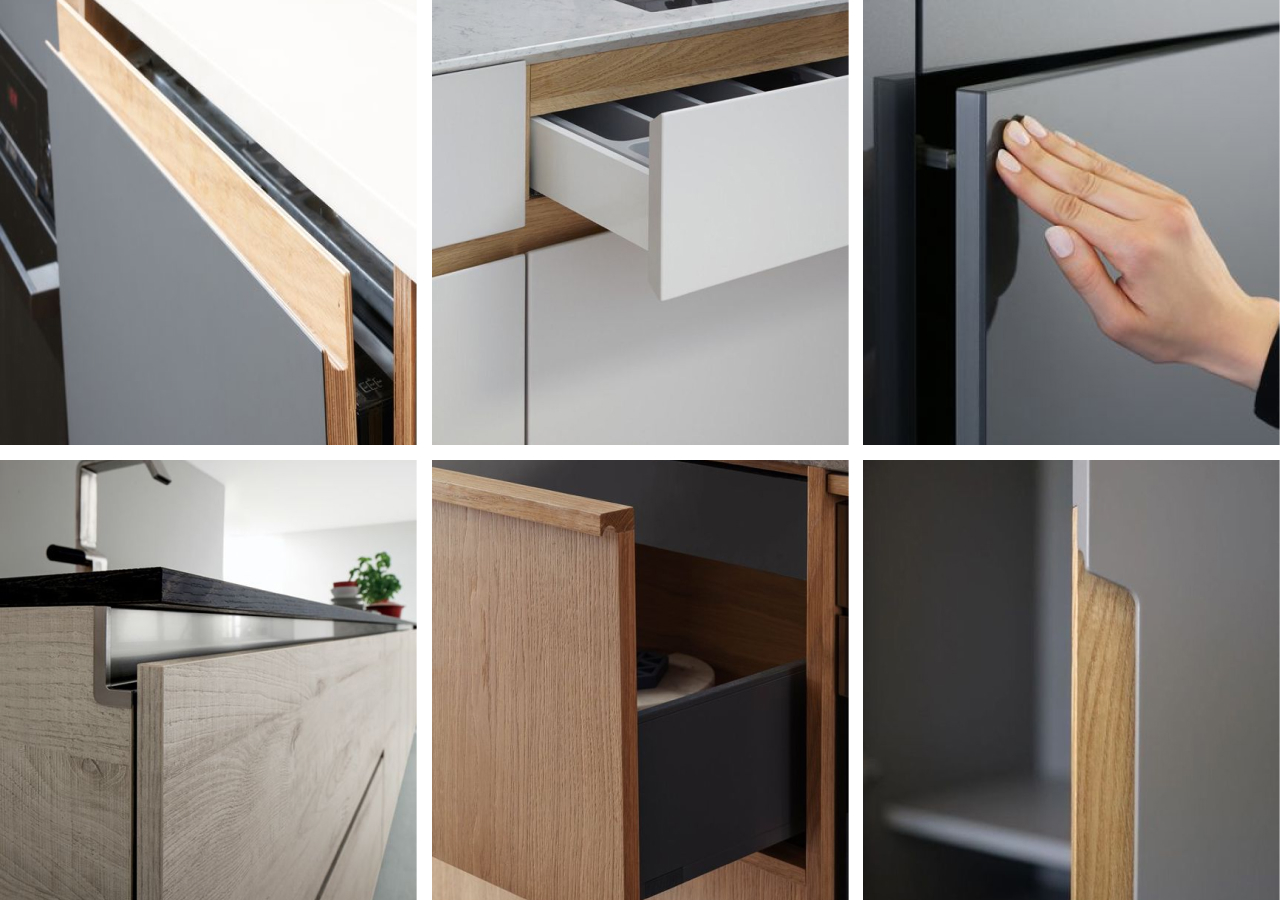
Do not default to Shaker just because it is safe. Shaker has a recessed center panel and works well in transitional homes and bungalows from the 1920s. But if you have a 1990s condo or a clean-lined modern space, a flat slab door in matte laminate or wood veneer makes more sense. Slab fronts are also cheaper to produce and feel very 2026. Handleless push-to-open systems and integrated finger pulls are showing up everywhere, from Blum hardware trends to IKEA’s latest lines.
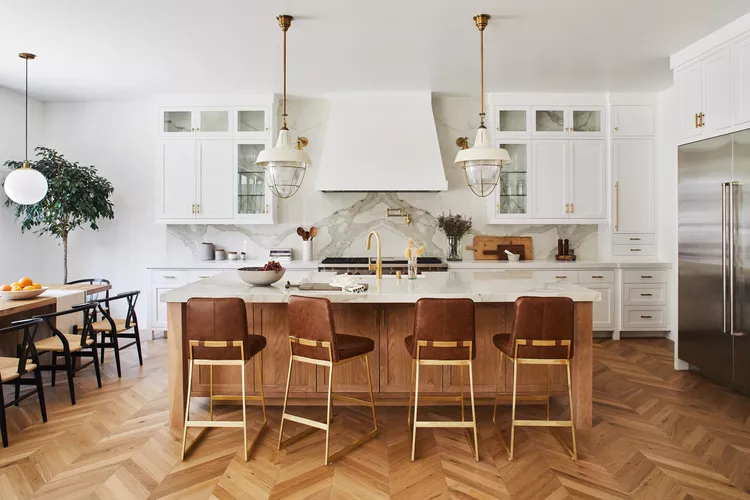
If your home has more traditional bones, a beaded inset door gives that furniture-like quality. For the biggest trend this year, warm wood is back in a big way. White oak with a wire-brushed finish adds texture and warmth without veering orange. This is not your mother’s honey oak. It is soft, light, and incredibly forgiving for resale. You can do warm wood on the lower cabinets and painted uppers, or go all wood for a calm, collected look.
Step 4: Select the Right Material and Finish for Long-Term Durability
The finish is what you touch every day. In a starter home, you need it to hold up to steam, cooking splatters, and maybe a future toddler.
Thermofoil and laminate cabinets are not the cheap-looking options they used to be. A matte thermofoil door in a deep color wipes clean easily and does not chip like painted wood. Painted MDF is another solid choice if factory-finished. Where people go wrong: buying old solid wood cabinets and trying to DIY paint them in a trendy dark hue without proper prep. Social media is full of regret posts where the paint peeled within a year. If you want a dark, dramatic look, buy it factory-finished.
That leads us to the 2026 kitchen cabinet color trends. Navy, forest green, and warm charcoal are having a moment, especially on lower cabinets. Color drenching, where the cabinets, walls, and trim all share the same hue, works surprisingly well in small galley kitchens. It blurs the edges and makes the space feel bigger, not smaller. But do not commit until you bring a large sample into your actual kitchen. Morning light and afternoon light can change a color completely. What looks like a smoky green on a showroom chip can turn muddy in your north-facing window.
As for the door material itself, plywood boxes beat particleboard for longevity. Solid wood doors can warp near a steamy dishwasher. A wood veneer over plywood gives you the best of both worlds: the look of real wood with more stability. If you are on a tight budget, a high-quality laminate slab door will outlast a poorly painted wood door every time.
Step 5: Map Your Storage Needs to Smart Interior Solutions

How you open a cabinet and what you see inside matters more than the door style.
Base cabinets with deep drawers instead of shelves are the single smartest upgrade you can make. You can see everything without getting on your hands and knees. For a first home kitchen, think in zones. A cooking zone near the stove with a drawer for pots, a prep zone with knives and cutting boards near the sink, and a landing zone next to the fridge for groceries.
There is one splurge I always recommend: a pull-out trash and recycling cabinet. It keeps mess hidden and saves floor space. A vertical tray divider above the fridge or next to the oven for baking sheets and cutting boards also costs very little but solves a real annoyance.
Earlier I mentioned the shift away from open shelving. Glass-front upper cabinets are the smarter way to get that airy, collected look. Keep one upper with glass doors to display your favorite mugs or a stack of plates. The rest, keep solid so you can hide the mismatched lids and protein powder. Blum soft-close hardware is standard now in most semi-custom lines. Make sure it is in your spec. A slammed cabinet door is a small irritation that wears on you every day.
Step 6: Pick Hardware and Finishing Touches That Elevate Without Upstaging

Nate Berkus once said, “I always tell people to invest in the things that are hard to change, cabinets and flooring. You can swap out hardware and paint later.” That is freeing, especially when you are staring at two dozen brass knob options.
If you chose slab doors, think about integrated finger pulls or push-to-open mechanisms. They create a seamless look that makes even budget cabinets feel custom. If you prefer handles, go with a simple bar pull in a finish that will not clash with your faucet. Mixing metals is fine if you keep it to two finishes max, one dominant and one accent.
Placement rules: knobs go on doors, pulls go on drawers. Center knobs on the stile, not the corner of the panel. Mount pulls horizontally on drawers, and for a contemporary look, mount them centered instead of at the top edge. These small details take five minutes to plan and make everything look more expensive. But again, do not overthink it. You can change these in an afternoon two years from now.
Step 7: Finalize Your Order and Prepare for Installation, Without Last-Minute Panic

The design is done. Now the part that trips people up.
Double-check your measurements. Then check them again. Order extra end panels and filler strips. Filler strips are thin pieces of wood that close gaps between a cabinet and a wall. Your walls are not straight, and filler strips make the whole run look built-in. If you skipped them, you would have awkward gaps filled with caulk that crack.
Lead times can be six to ten weeks. That is fine. Use that time to schedule a good installer. If you are using CliqStudios or a similar semi-custom company, their design support team will flag mistakes before the order is placed. That alone can save you hundreds in restocking fees.
When the boxes arrive, open everything and check for damage within 48 hours. Many companies have short claim windows. During install, expect the unexpected. Floors that slope, corners that are not 90 degrees. A skilled installer handles this with shims and filler pieces. For a first-time homeowner managing the project, the best advice is to be on site the first day, walk through the plan with the installer, and then let them work. You do not need to hover over every screw.
The Kitchen You Will Love Opening Every Morning
Choosing kitchen cabinets for your first home can feel like a test you did not study for. But you just worked through it in order. You measured the space, set a budget, picked a door style that suits your house, chose a durable finish, planned smart storage, selected hardware that fades into the design, and prepared for a smooth install.
That beats the Pinterest impulse every time. You are not designing for a photo shoot. You are designing for Tuesday mornings when you pour coffee and open the utensil drawer without thinking. Process trumps panic. If you do one thing today, grab that tape measure and start with Step 1. The rest will fall into place.